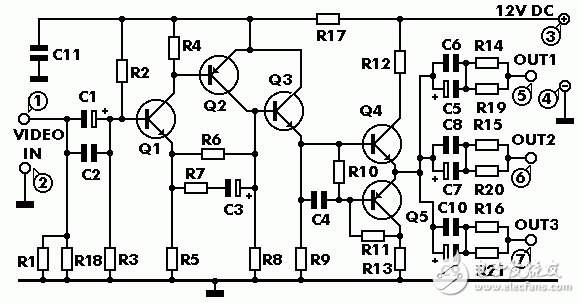
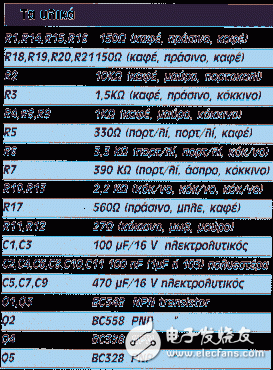
Video recorders are now more and more popular among the masses, and this is also a hot market. The circuit presented in this article is provided with a wide band amplifier, which will take video signals from your VCR and will expand them fully to drive up to 3 monitors, TVs, they can accept direct video signals, or other VCRs Recording from one video to the other three. It will also become possible to record from a video to two people connected at the same time to check that you are recording a monitor. This amplifier is also very useful if the recorder is far from the display. working principle The circuit uses five transistors and is a wideband amplifier with a 5 MHz bandwidth. The signal is applied at points 1 and 2 (ground) and taken through the first phase of C1, which is a preamplifier and built around the first quarter. In the first quarter of the output DC coupling, 3 in the second quarter it amplified the signal more because they are DC-coupled preamplifiers with almost no distortion and amplification is quite high. Finally, the signal output from the third quarter is the output transistor of the Fed's Q4 and Q5. The two transistors are complementary to each other, and the signals from their common transmitter are distributed from the RC network to the various devices of the drive circuit. The circuit requires a 12 volt DC power supply and it is better if it is a stable indicator circuit like printed elsewhere. step Let us first consider some basics of building an electronic circuit for a printed circuit board. A thin layer of conductive copper is encased in such a way as to form the necessary conductor-shaped thin insulating material between the various components of the circuit. The use of a properly designed printed circuit board is ideal because its speed construction is greatly increased, reducing the possibility of making mistakes in decision making. The Smart Kit board also has pre-drilled parts and components printed on their side to make the building easier to contour. In order to protect the stored in the oxidized, and to ensure that it is intact copper is canned in the production process, covered with a special varnish to prevent oxidation, but also make welding easier. The components soldered to the board are the only way to build your circuit, and your way depends largely on your success or failure. This work is not very difficult, if you stick to some rules, you should have no problem. The soldering iron you use must be light, its power should not exceed 25 watts, and must be kept clean at all times. It is very convenient for this purpose. It is specially made to keep the sponge moist. From time to time, it can remove all the residues and often accumulate hot spots for them. Tip: Do not make documents or sandpaper dirty or worn. Tip: If the prompt cannot be cleared, replace it. There are many different types of solder on the market, and you should choose a good quality one that contains the necessary flow at its core to ensure perfect integration every time. Do not use flux except that it is already included in the solder. Too many fluxes can cause many problems and are one of the main causes of circuit failure. However, if you have to use extra flux, as it is when you have tin-copper wire, the cleaning is very thorough and you finish your work. Correct, with the welding components do the following: - clean the wires of the assembly with a small piece of sandpaper, - Bend the components of the body the correct distance they and their inserts on the board. - You may sometimes find a component that is larger than the usual weighting information, too thick, and enters the hole in the printed circuit board. In this case, use a small drill hole to zoom in slightly. Do not make holes too big, because this is difficult to weld After that, with the hot iron and the tips on the location and its component leads, the soldering wire appears first from the board at the same time. The tip must be touched to cause a slightly higher than the PC board - When the solder begins to melt and flow, wait until it covers the area around the uniform pores and flux and the solder from below. The entire operation should not exceed 5 seconds. Remove the iron and leave the solder joints to cool naturally without blowing or moving the components. If all normal articular surfaces must have a bright metallic texture, the edges should smoothly end the leader and board tracks on the assembly. If the solder looks dull, cracked, or has a blob shape, then you have a dry joint, you should remove the solder (with a pump, or tin wire) and redo - be careful not to overheat the track because it is easily removed from the inside They break them - It is good practice when you are welding sensitive components. - Make sure you don't use more solder than it is necessary because you are running the risk of shorting the boards on adjacent tracks, especially when they are very close. - Output 5, 6, 7 (signal) and 4 (normal) as it is the only two outputs initial connection. For the third, you should also connect positive information about C7 and C9 together. Thin Film Transistor,Tft Ad Lcd Screen,Tft Lcd Screen Colour,3.5 Inch Tft Lcd Screen,TFT ESEN Optoelectronics Technology Co., Ltd, , https://www.esenlcd.com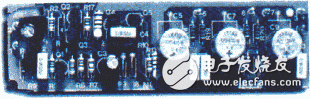
- When you have finished your work, cut off excess component leads and clean the board with a suitable solvent to thoroughly remove all flux residues, it may still be.
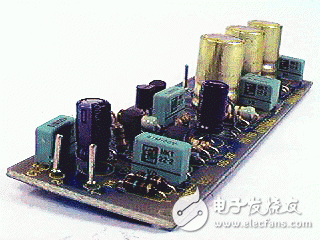
- There should be no difficulties in construction if you carefully follow the circuit diagrams and locations of the components in their place as it is outlined on the side of the printed circuit board assembly. Solder all the pins, resistors, capacitors, and electrolytically connect them to the correct polarity, and finally in their place and solder them into the transistor overheating very carefully when soldering can destroy them for the first time.
When all components are soldered carefully check the circuit, if you are satisfied with the error, make the following connections: - ( - ) 3 (+12 V) and 4 points of supply voltage - input signal 1 point (signal ) and 2 (common)