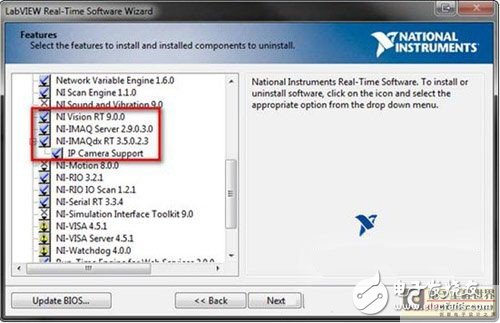
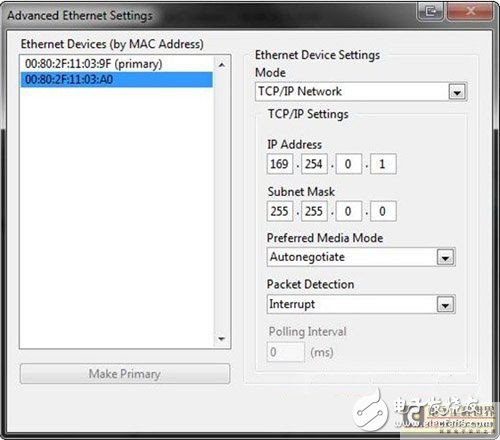
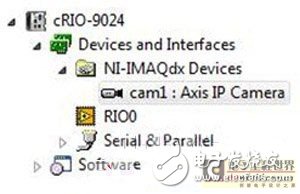
The NI CompactRIO Programmable Automation Controller (PAC) is an advanced embedded control and data acquisition system designed for applications that require high performance and reliability. Thanks to the open and embedded architecture, small size, extremely rugged and flexible, you can quickly build popular embedded systems with off-the-shelf commodity hardware. When combined with the NI Vision Development Module 2009 or newer, CompactRIO is an effective platform for embedded, industrial, real-time machine vision applications. Potential applications include autonomous robotics, medical devices, industrial monitoring applications, and embedded applications. This article contains the installation and configuration of the IP camera for CompactRIO. How to install and configure the moviMED AF-1501 C Series module See CompactRIO Vision using the MoviMED AF-1501 C Series Analog Frame Receiver. CompactRIO installation In order to install the applicable software for CompactRIO hardware, you must first install it to the host PC. The two required parts are NI Vision 9.0 and NI-IMAQdx 3.4 driver software. You can detect this software by opening the My System icon in the Measurement and Automation Navigator (MAX). Once you have detected that the host PC has the correct software, you must install the software to your CompactRIO controller so that you can get the image from the IP camera. The CompactRIO controller should appear under the remote system icon in MAX. Open the target and right click on the software and select Add/Remove Software. This opens the labview real-time software wizard. Select the usual software installation and click Next. Choose Agree to continue with the manual installation. The two parts of the software must be supported by NI Vision RT 9.0.0 and IP Camera. Find IP camera support under NI-IMAQdx RT. Once you have chosen to install both software, click Next to begin the installation. Once you have completed the necessary software installation and rebooted the system, click on CompactRIO under Remote System to open the network settings. By default, the secondary Ethernet port of the CompactRIO controller is not active, so you must set up your IP camera to enable communication over the network. To do this, select Advanced Ethernet Settings. Once the setup window opens, click on the secondary MAC address book under the Ethernet device, switch the mode to TCP/IP, and set the IP address to 169.254.0.x for LAN connection with the subnet mask set to 255.255. 0.0. Click Finish when these settings are the same as the screenshot below, then click Agree when prompted to restart your computer. Camera installation Now that you have the CompactRIO controller using the secondary Ethernet port, the IP camera can be displayed with MAX, and in MAX you can use it to properly configure the camera. Plug the camera into the secondary port of the CompactRIO controller. If the Ethernet port is lit, your configuration is correct and the network can detect the camera. In CompactRIO in MAX, open the device and interface menus, then open the NI-IMAQdx device and you will see an IP camera called camX, where X is the value assigned to your camera by the driver. At the top of the menu bar, you can click on a photo to get a still image or video from your camera to get a video. This screen also appears when you select the icon at the bottom to change the acquisition properties and camera properties. When you can see the camera under MAX and capture images, you can turn off MAX. Remember the name of the IP camera in the labview (for example: cam1). Labview installation Now that the CompactRIO controller and IP camera are properly configured, you now need to set up the labview VI to use both hardware. To achieve this, pass the file under labview? New File...Open a new project, then open the project and select an empty project. Labview will then create a project called Untitled Project 1. By selecting a file? Save As and copy "Visual" to the file name and rename the project to Visual. Then right click on the project: Vision.lvproj and select New File Task and Device Open real-time CompactRIO. The CompactRIO controller using the IP camera should be in the list. Select it and click Agree. Select Continue—The scan interface is acceptable for this application because there is no need to use a CompactRIO FPGA for an IP camera. The CompactRIO controller is listed as a task in the visual project. To get an image from an IP camera, use a template program called Get.vi. To add this VI to the task, right click on the CompactRIO option under the project and select Add? File... Then select the original driver, located in the path where the NI software is installed and stored in C:\Program Files\NaTIonal Instruments\labview 2009\examples\IMAQ\IMAQdx Examples.llb\Grab.vi and click Select. Double-click on Get.vi in ​​the project to open the front panel. Select the down arrow under the camera and select the name that matches the IP camera configuration in MAX (for example: cam1). Clicking the Run arrow should display the video captured from the IP camera.
Innosilicon Asic Miner:Innosilicon A9 ZMaster,Innosilicon A9++ ZMaster,Innosilicon A9+ ZMaster
Innosilicon is a worldwide one-stop provider of high-speed mixed signal IPs and ASIC customization with leading market shares in Asian-Pacific market for 10 consecutive years. Its IP has enabled billions of SoC's to enter mass production, covering nodes from 180nm to 5nm across the world`s foundries including: GlobalFoundries, TSMC, Samsung, SMIC, UMC and others. Backed by its 14 years of technical expertise in developing cutting-edge IPs and ASIC products, Innosilicon has assisted our valued partners including AMD, Microchip and Microsoft to name but a few, in realizing their product goals.
Innosilicon team is fully devoted to providing the world's most advanced IP and ASIC technologies, and has achieved stellar results. In 2018, Innosilicon was the first in the world to reach mass production of the performance-leading GDDR6 interface in our cryptographic GPU product. In 2019, Innosilicon announced the availability of the HDMI v2.1 IP supporting 4K/8K displays as well as our 32Gbps SerDes PHY. In 2020, we launched the INNOLINK Chiplet which allows massive amounts of low-latency data to pass seamlessly between smaller chips as if they were all on the same bus. With a wide range of performance leading IP in multiple FinFET processes and 22nm planar processes all entering mass production, Innosilicon's remarkable innovation capabilities have been proven in fields such as: high-performance computing, high-bandwidth memory, encrypted computing, AI cloud computing, and low-power IoT.
innosilicon zec miner,Innosilicon A9 ZMaster,innosilicon a9 50ksol miner,innosilicon a9 miner,a9 50ksol zmaster Shenzhen YLHM Technology Co., Ltd. , https://www.ylhm-tech.com